Writing your first App
ProconTEL 4 App Templates are distributed as a standalone web Apps, which are built on top of SDK. In this article we will go step by step and write a simple App Template working with ProconTEL 4 from scratch.
Our sample App Template will manufacture a slab every 5 seconds, broadcast information about it and handle these pieces of information.
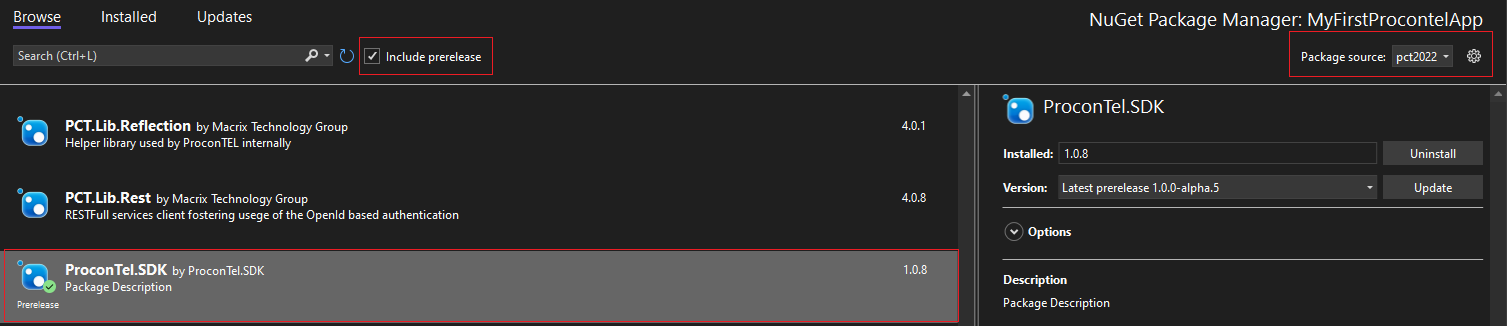
As a prerequisite please add PCT4 SDK https://nexus.macrix.eu/repository/pct2022 repository to nuget Package sources.
Create new ASP.NET Web API project in Visual Studio
Our starting point is default ASP.NET Web API template.

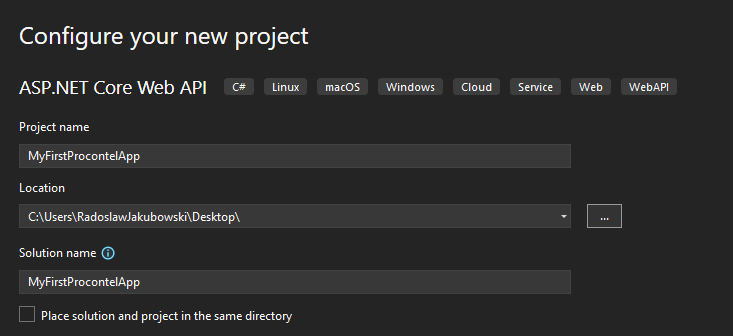
Configure project details (name, location, etc.)
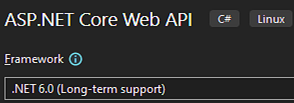
Select .NET 6.0 LTS as a target framework
Cleanup template-generated solution
After project creation, we are given a solution like this:

Few parts which got auto-generated are redundant to us. That's why we can delete files marked with red.

After this step, our solution should like this.

Install PCT SDK
Using package manager console install ProconTEL 4 SDK via command Install-Package ProconTel.SDK.
Same result can be achieved by using NuGet Package Manager user interface. Package will be visible after ticking Include prerelease box.
Cleanup Program.cs file
Next step is to delete all content from Program.cs file. It should be completely empty at this point.
Update contents of Program.cs file
With all previous preparation we are now ready to leverage power of ProconTEL 4. ProconTEL 4 gives us flexibility when it comes to starting new project. We can use either Minimal API or Standard approach. Let's start with Minimal API.
Minimal API
To use the Minimal API, we need to use the static ProconTelApp class and its method StartAsync as shown below.
using ProconTel.SDK;

await ProconTelApp.StartAsync(args, null);
Second parameter is a delegate function which allows us to register any services we want - just like in ASP.NET, e.g.
await ProconTelApp.StartAsync(args,
    services =>
    {
        services.AddScoped<IMySampleService, MySampleService>();
    });
Congratulations! You've just created your first ProconTEL 4 App. How simple was that?
Whilst Minimal API approach is very user-friendly and should cover lots of use cases, there is another option if you'd like to have even more control.
Standard API
Standard API allows you to use the traditional WebApplicationBuilder approach. The example below shows the same scenario as used for Minimal API approach but using API which gives you more control over App creation.
var builder = WebApplication.CreateBuilder(args);

builder.WebHost.ConfigureProconTel(builder.Configuration);
builder.Services.AddProconTel(builder.Configuration);

builder.Services.AddScoped<IMySampleService, MySampleService>();

var App = builder.Build();
App.UseProconTel();
App.MapProconTel();
await App.RunAsync();
Writing App Logic
Let's see it in action. Example uses Minimal API approach.
Producing slab and sending message
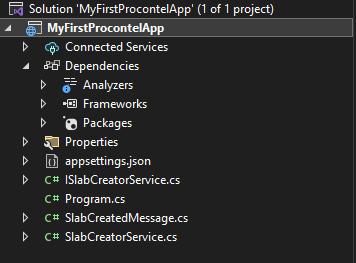
To create our slab producer which will send a message on slab creation every 5 seconds we need three basic parts: SlabCreatorService abstraction, concretion and message model. Our project should look like this:
Then, we will implement our SlabCreatedMessage model:
namespace MyFirstProcontelApp
{
    public enum SteelGrade
    {
        Damaged,
        Low,
        Perfect,
    }

    public record SlabCreatedMessage(string Id, string Description, SteelGrade Grade);
}
Our ISlabCreatorService interface:
namespace MyFirstProcontelApp
{
    public interface ISlabCreatorService
    {
        SlabCreatedMessage CreateSlab();
    }
}
And our SlabCreatorService:
namespace MyFirstProcontelApp
{
    public class SlabCreatorService : ISlabCreatorService
    {
        private static int SlabId = 1;

        public SlabCreatedMessage CreateSlab()
        {
            return new SlabCreatedMessage(
                $"Slab-{SlabId++}",
                "Steel slab has been created",
                (SteelGrade)new Random().Next(0, 3));
        }
    }
}
To make use of our newly created service we are going to register it in Program.cs
using MyFirstProcontelApp;
using ProconTel.SDK;

await ProconTelApp.StartAsync(args, services =>
{
    services.AddScoped<ISlabCreatorService, SlabCreatorService>();
});
Now, as our slabs producer is created and ready to use, we are going to create the background job which will trigger creation of new slab every 5 seconds, log and send this information via ProconTEL 4.
We'll create SlabCreatorScheduledJob class with implementation of:
using ProconTel.SDK.Messaging;
using ProconTel.SDK.Scheduling;

namespace MyFirstProcontelApp
{
    public class SlabCreatorScheduledJob : IScheduledJob
    {
        private readonly ILogger<SlabCreatorScheduledJob> _logger;
        private readonly ISlabCreatorService _slabProducerService;
        private readonly IMessageBus _messageBus;

        public SlabCreatorScheduledJob(ILogger<SlabCreatorScheduledJob> logger, ISlabCreatorService slabCreatorService, IMessageBus messageBus)
        {
            _logger = logger;
            _slabProducerService = slabCreatorService;
            _messageBus = messageBus;
        }

        public async Task RunAsync()
        {
            var slab = _slabProducerService.CreateSlab();
            _logger.LogInformation($"Creating a new steel slab Id: {slab.Id} Description: {slab.Description}, Grade: {slab.Grade}");
            await _messageBus.PublishAsync(slab);
        }
    }
}
And register it in ProconTEL 4 in Program.cs as follows:
using MyFirstProcontelApp;
using ProconTel.SDK;

await ProconTelApp.StartAsync(args, services =>
{
    services.AddScoped<ISlabCreatorService, SlabCreatorService>();
    services.AddScheduledJob<SlabCreatorScheduledJob>().WithCronSchedule("0/5 * * ? * * *");
});
It's done! Frequency of creating new slabs can be very easily adjusted here with cron schedule or fluent API given by SDK.
Handling messages is also super-simple
Let's create a SlabCreatedMessageHandler class with given implementation:
using ProconTel.SDK.Messaging;

namespace MyFirstProcontelApp
{
    public class SlabCreatedMessageHandler : IMessageHandler<SlabCreatedMessage>
    {
        private readonly ILogger<SlabCreatedMessage> _logger;

        public SlabCreatedMessageHandler(ILogger<SlabCreatedMessage> logger)
        {
            _logger = logger;
        }

        public async Task HandleAsync(SlabCreatedMessage message)
        {
            await Task.CompletedTask;
            _logger.LogWarning($"Slab with {message.Id} created. Quality: {message.Grade}");
        }
    }
}
And register it like we did earlier:
using MyFirstProcontelApp;
using ProconTel.SDK;

await ProconTelApp.StartAsync(args, services =>
{
    services.AddScoped<ISlabCreatorService, SlabCreatorService>();
    services.AddScheduledJob<SlabCreatorScheduledJob>().SetCronSchedule("0/5 * * ? * * *");
    services.AddMessageHandler<SlabCreatedMessageHandler, SlabCreatedMessage>();
});
Ain't it straightforward? Our SDK exposes methods and interfaces to handle even more sophisticated scenarios.
Configuration
Our App Template logic is created, but there is still one very important step - configuration. Let's see how it is done in ProconTEL 4.
Specifying basic configuration
Specifying basic configuration is really straightforward. We just use appsettings.json file to provide settings by editing this file, e.g. (configurations in red were added by us):
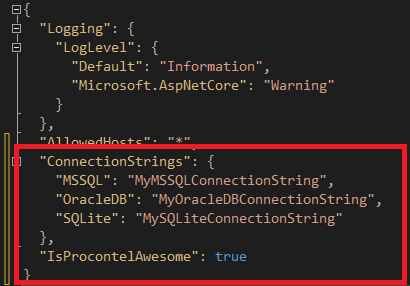
Settings from appsettings.json will be used at runtime, even if they are not shown in the PCT4 GUI.
These values can still be overridden later during the App Template configuration step in the UI. This behavior allows users to either manage settings via appsettings.json or through the ProconTEL interface. It's a feature designed to support both workflows.
Further actions regarding specification are described here and here.
Using newly created project
Our project slab producer is implemented. Please follow uploading App Templates article on how to use newly created App Template.